Is it necessary to transfer the images from your iPhone to your Mac? Here you will find three tried-and-true ways that have shown to be effective. If you’ve taken many screenshots or want to make a backup of your iPhone, this is a great way to clear up storage space. Furthermore, we will do our best to accommodate both the technically savvy and the more practical users by providing both wired and wireless options for maximum speed. let me show you how to transfer images from your iPhone to your Mac.
Method 1. Get photos from iPhone to Mac via USB cable
A Lightning-to-USB connector allows you to connect your iPhone to your Mac. After that, just do as instructed.
1. Use the Photos app
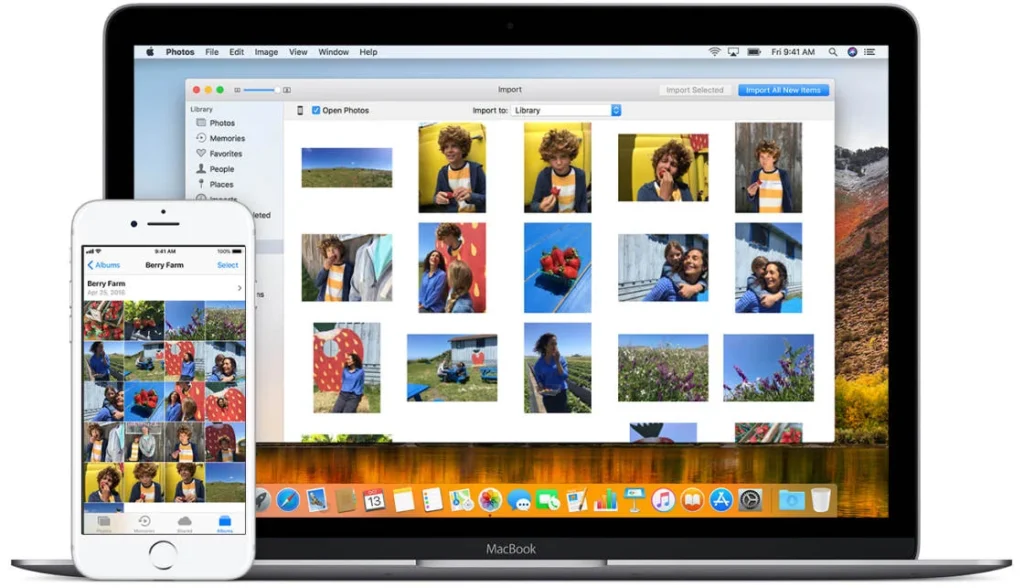
- Boot up your Mac and launch the Photos app.
- It is expected that the Import window will appear instantly. In case you can’t find it, you can access it by tapping on the name of the device (e.g., Jack’s iPhone) in the left-hand sidebar, under the Devices section.
- The question “Do you trust this computer?” will probably pop up.Select Trust to continue. Unlocking your iPhone with the passcode is also a common requirement.
- Click on “Import Selected” after you’ve chosen your photographs. Also, you can use the “Import All New Photos” button on the top right.
2. Use the Image Capture App
- On your Mac, launch Image Capture.
- In the left-hand bar, under “Devices,” you should see your iPhone listed.
- To choose a spot on your Mac, click the “Import To:” button at the window’s bottom.
- To import photos, just find them in the library and click the “Import” button in the lower right corner.
- Not required. Choose the option to import all files.
Method 2. How to use iCloud and Photo Stream to transfer photos from iPhone to Mac
One of the best things about Apple products is the ability to use iCloud to store photos online. Photo Stream is almost similar, with the exception that you can only keep 1000 photographs in total and 30 days of storage. Follow these steps.
1. Photo Stream
- Launch Apple’s Settings app on your iOS device.
- Choose iCloud by tapping on your name up top.
- Next to Photos in the list of apps that use iCloud, you should see “On.” Tap on that option.
- Turn on Upload to My Photo Stream.
- Get on your Mac and launch the Photos app.
- To access the preferences, go to the menu in the top left corner, then click on Photos.
- Click on the iCloud icon.
Mark the option next to My Photo Stream. - When you turn on your Wi-Fi, all of your photos will automatically be transferred to the Photos app.
2. iCloud
- Refer to the preceding steps 1–3.
- Turn on iCloud Photos.
- Press the Apple icon on your Mac’s top left.
- In the upper right corner of System Preferences, you should see Apple ID. Click on that.
- Verify by checking the boxes next to iCloud Drive and Photos.
- Type in your administrator password when asked.
- When the upload is finished, go to Photosapp to see the results.
Method 3. Steps to move images between iPhone and Mac via AirDrop
Your iPhone and Mac must be linked to the same WiFi network in order for this to function. Proceed with this.
- Start up your iPhone’s Photos app.
- To send a photo or photos, tap on them.
- Reach down and touch the share symbol on the bottom left.
- From the menu that appears, choose AirDrop.
- When prompted, choose the name of your machine. Take Jack’s MacBook Pro as an example.
- A “Sent” indication will appear if the process was successful.
- To make sure it happened, launch Finder on your Mac. From the menu, choose Go. Then, choose AirDrop. Finally, select Everyone.
- Either choose a destination by clicking the Save button, or they will be saved to your iCloud account automatically.
Easy wireless alternative. Use the Mail app
Even while you’re not at home, you can easily share a single or small number of photographs across your Apple devices using this method. I’ll show you how.
- Refer to the preceding steps 1–3.
- Choose “Mail” from the menu that appears.
- To send, just type in your email address and adjust the picture dimensions as necessary.
- All you have to do is launch the Mail app on your Mac.
- View the photos in your inbox, then save them to a spot of your choosing.

Method 4. Using Third-Party Apps to Import Photos from iPhone to Mac
Even while Apple provides many options for transferring images from an iPhone to a Mac, some users might still choose to utilise third-party apps because they offer more capabilities and have easier interfaces. Adobe Lightroom and the Photo Transfer App are two outstanding examples.
Adobe Lightroom
Photographers love Adobe Lightroom because it’s a powerful programme for altering photos. Additionally, it has a convenient feature that lets users transfer images from their iPhones to the Mac software. In this way:
- If you own an iPhone or Mac, you can get Adobe Lightroom from the App Store.
- Choose the images you wish to import into Adobe Lightroom on your iOS device.
- Select “Direct Import to Lightroom” from the “Share” menu.
- Check that the Wi-Fi networks on your iPhone and Mac are identical. You should be able to import the chosen photographs from your iPhone into Lightroom on your Mac after it detects your device.
Photo Transfer App
When you need to move media files between devices, turn to the straightforward and easy-to-use Photo Transfer App. You won’t need a USB cable anymore thanks to the app’s Wi-Fi transfer capabilities. Just do as instructed:
- To transfer photos from your iPhone to your Mac, get the Photo Transfer app.
- Join the two gadgets to the identical wireless network.
- Just launch the app on your iPhone, choose the photos you wish to send, then hit the “Send” button.
- Just launch the Photo Transfer App on your Mac and hit the “Receive” button. The transfer of your photos should begin soon.

With these easy-to-follow steps, you can link your iPhone’s photo library to your Mac, making all of your precious moments and memories easily available on any device. In a matter of seconds, you may access all of your beloved photographs, whether you want to sort them, share them, or keep them for the future. Enjoy a seamless connection between your iPhone and Mac by taking advantage of these methods’ simplicity and easiness, which will streamline the transfer procedure and improve your experience.